Clay Sourcing and Preparation
Prerequisites:
Parent Technology:
Description
Finding and preparing suitable clay is the essential first step in pottery making. Clay is a naturally occurring material composed of fine-grained minerals that becomes plastic when wet and hardens when fired. While modern potters typically purchase refined clay, our ancestors had to locate and process their own clay from natural sources. This guide covers how to find clay deposits in the wild and prepare them for pottery making using only primitive tools and techniques.
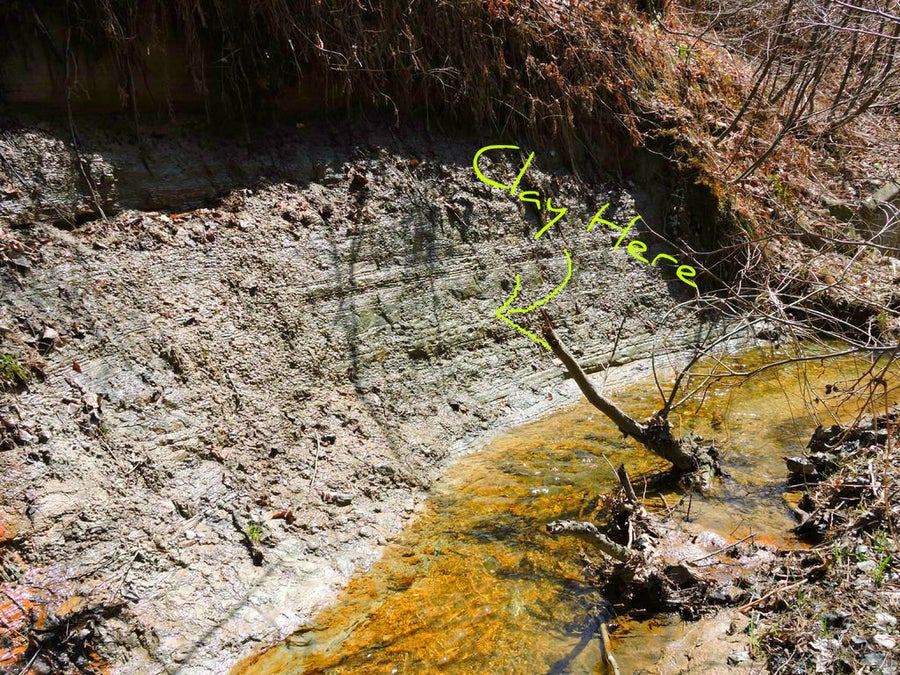
Natural clay deposit exposed in a riverbank
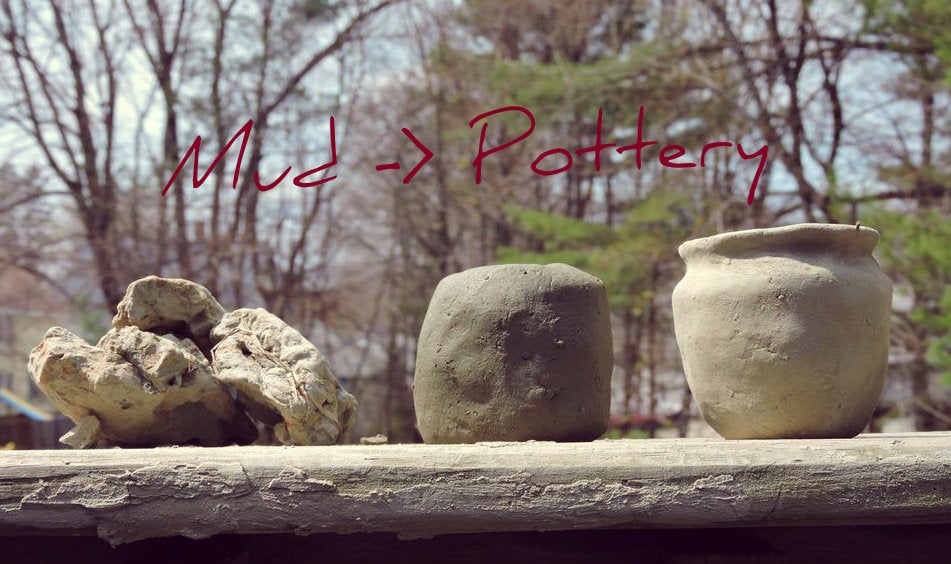
Pottery vessels made from natural clay
Locating Clay Deposits
Where to Look
Clay deposits can be found in many environments, but some locations are more promising than others:
- Riverbanks and Streambeds: The most common and accessible sources of clay. Look for exposed banks where water has cut through the soil, revealing different layers. Clay is often found in lower layers.
- Lake Shores: Especially where the water level has receded, exposing the shore.
- Road Cuts and Construction Sites: Where earth has been excavated, exposing subsurface layers.
- Eroded Hillsides: Where rain has washed away topsoil, exposing clay deposits beneath.
- Fields After Plowing: Clay might be turned up by agricultural activity.
Visual Identification
Clay can vary widely in color depending on its mineral content:
- Red, Orange, or Brown: Indicates iron content (common in earthenware clays)
- Gray or Blue-Gray: Often indicates the presence of organic material
- White or Light-Colored: May indicate kaolin clay (used for porcelain)
- Yellow or Tan: Common in many earthenware clays
Look for a distinct change in soil color and texture compared to surrounding soil. Clay layers often appear more uniform in color and texture than other soil types.
Physical Tests
Once you've found a potential clay deposit, perform these simple tests:
- Touch Test: Wet clay feels smooth and slippery between your fingers, unlike sand or silt which feel gritty.
- Ribbon Test: Take a small amount of moistened material and roll it into a ball about the size of a walnut. If it can be rolled into a ball without crumbling, it likely contains clay. Then roll it into a snake and try to bend it into a ring. The more clay content, the more flexible it will be without cracking.
- Shine Test: Rub a small piece of moistened material between your fingers or against a hard surface. Clay will develop a shiny surface when rubbed.
- Bite Test: Historically, potters would bite a small piece of clay. Pure clay feels smooth between the teeth, while sandy clay feels gritty.
Collecting Clay
Once you've identified a clay deposit, follow these steps to collect it:
- Clear away any surface debris, plants, or loose soil to expose the clay layer.
- Use a digging stick, stone tool, or wooden shovel to extract the clay. Try to avoid mixing in topsoil or other non-clay materials.
- Collect the clay in a container like a basket lined with large leaves, a wooden bowl, or a hide container.
- If the clay is very dry and hard, you can add a small amount of water to make it easier to extract.
- Collect more than you think you'll need, as the refining process will reduce the usable amount.
Processing Methods
Natural clay contains impurities like stones, roots, and organic matter that must be removed before use. There are two main approaches to processing clay:
Dry Processing Method
This method is faster but less thorough than wet processing:
- Drying: Spread the clay in a thin layer on a flat surface in the sun or near a fire until completely dry.
- Crushing: Use a stone or wooden mallet to crush the dried clay into a fine powder.
- Sieving: Pass the crushed clay through a sieve made of woven grasses or a loosely woven fabric to remove larger particles.
- Rehydrating: Gradually add water to the powder and knead until it reaches a workable consistency.
- Manual Cleaning: As you knead, remove any remaining impurities you can feel with your fingers.
Wet Processing Method
This method produces cleaner clay but takes longer:
- Slaking: Break the clay into small pieces and place in a container with plenty of water. Let it soak until the clay completely breaks down (1-2 days).
- Mixing: Stir the mixture thoroughly until it becomes a smooth, creamy consistency (slip).
- First Sieving: Pour the slip through a coarse sieve (made from woven grasses or fabric) to remove large impurities.
- Second Sieving: Pour the slip through a finer sieve to catch smaller impurities.
- Settling: Allow the clay particles to settle in the container. Heavier particles will sink to the bottom.
- Decanting: Carefully pour off the clear water that rises to the top.
- Drying: Pour the remaining slip onto a flat, absorbent surface (like a plaster slab or cloth stretched over sand) to dry until it reaches a workable consistency.
Adding Temper
Temper is non-plastic material added to clay to reduce shrinkage during drying and firing, which helps prevent cracking. Common primitive tempers include:
- Sand: Fine sand improves workability and reduces shrinkage.
- Crushed Shell: Provides calcium carbonate that helps with firing.
- Crushed Pottery (Grog): Previously fired pottery ground into powder.
- Plant Fibers: Dried grass, straw, or other plant materials that burn out during firing, creating small air pockets that help prevent cracking.
- Volcanic Ash: If available in your region.
Adding Temper to Clay
- Prepare your temper material by crushing or grinding it to a consistent size.
- Spread your processed clay out on a flat surface.
- Sprinkle the temper material evenly over the clay.
- Fold and knead the clay repeatedly to distribute the temper evenly throughout.
- Continue kneading until the temper is fully incorporated and the clay has a consistent texture.
The amount of temper to add varies depending on the clay and the specific temper material, but a general guideline is to add about 20-30% temper by volume.
Testing Clay Quality
Before committing to making pottery with your processed clay, perform these tests:
- Coil Test: Roll a piece of clay into a coil about the thickness of your finger and about 6 inches (15 cm) long. Bend it into a ring. If it cracks severely, the clay may need more processing or different temper.
- Shrinkage Test: Make a small test tile, mark its size when wet, let it dry completely, and measure again. Excessive shrinkage (more than 10%) may indicate problems.
- Small Test Firing: Create a small test piece and fire it using your planned firing method. This will reveal how the clay behaves during firing.
Storing Prepared Clay
To keep your processed clay workable:
- Store in a cool, damp place away from direct sunlight.
- Wrap in wet cloths or large leaves to maintain moisture.
- For longer storage, keep in a pit lined with wet leaves and covered with a hide or more wet leaves.
- If the clay becomes too dry, it can be rehydrated by sprinkling with water and kneading.
- If the clay becomes too wet, spread it out to dry slightly.
Common Challenges and Solutions
Clay Too Sandy
Solution: Process using the wet method to allow sand to settle out, or add more pure clay if available.
Clay Too Sticky
Solution: Add more temper material or mix with sandier clay.
Clay Cracks When Drying
Solution: Add more temper, particularly sand or grog, and ensure slower, more even drying.
Clay Too Soft/Doesn't Hold Shape
Solution: Allow to dry more before working, or mix with stiffer clay.
Clay Has Organic Material
Solution: Improve sieving process or pick out visible impurities by hand. For wet processing, allow longer settling time.
Next Steps
Once you have prepared your clay, you can proceed to:
- Basic Forming Techniques - Methods for shaping clay into vessels
- Drying and Finishing - Properly drying and decorating your pottery
- Primitive Firing Methods - Techniques for firing pottery without a modern kiln