Description
Earthbag construction is a simple yet effective building technique that uses bags filled with earth or other materials to create durable structures. This method requires minimal specialized tools and can be accomplished using locally available materials, making it ideal for rebuilding in a primitive technological environment. Earthbag buildings are resistant to fire, floods, earthquakes, and extreme weather, providing reliable shelter with excellent thermal properties.

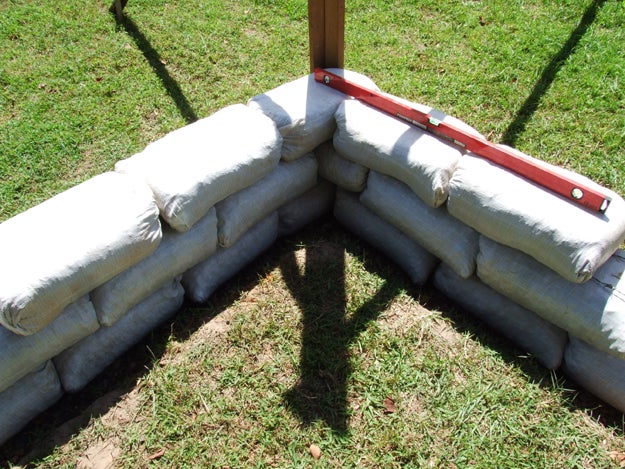
Earthbag construction in progress, showing stacked bags with level for alignment
Practical Guide to Earthbag Construction
1. Materials Needed
- Bags: Woven polypropylene bags (ideal), burlap sacks, or any durable fabric bags
- Fill Material: Soil with 15-30% clay content, sand, gravel, or volcanic rock
- Barbed Wire: For "velcro" between courses (can be substituted with thorny branches)
- Tools: Shovels, buckets, tampers, scissors/knife, measuring tools
- Protective Coating: Clay plaster, lime plaster, or mud mixture
2. Site Preparation
- Choose a well-drained site away from flood zones
- Clear the area of vegetation, rocks, and debris
- Mark the building outline using stakes and string
- Dig a foundation trench 12-18 inches deep and twice as wide as your planned wall
- Fill the trench with gravel or crushed stone for drainage (6-8 inches)
3. Preparing the Fill Material
- Test your soil by creating a ball and dropping it from waist height:
- If it shatters, it has too much sand
- If it flattens without cracking, it has too much clay
- If it breaks into a few pieces, it's ideal
- Adjust soil composition by adding clay or sand as needed
- Moisten the soil until it clumps when squeezed but doesn't leave water on your hand
- Screen out large rocks and organic material
4. Filling and Placing Bags
- Create a filling station with buckets and shovels
- Fold the bag's end under itself to create a flat bottom
- Place the bag in a bucket or have a partner hold it open
- Fill bags about 3/4 full with your prepared material
- Fold the top of the bag under itself to close (no need to tie)
- Place the filled bag in the foundation trench, folded end facing inward
- Tamp the bag flat with a tamper (can be made from a log with handles)
- Continue placing bags end-to-end around the entire foundation
5. Building the Walls
- Place barbed wire or thorny branches on top of the first course of bags
- Start the second course by placing bags centered over the joints of the first course
- Maintain vertical alignment using plumb bobs or levels
- Tamp each bag thoroughly after placement
- Add barbed wire between each course
- For curved walls, place bags with slight offsets to create the desired curve
- For corners, alternate the bag direction in each course for strength
6. Creating Door and Window Openings
- Build temporary wooden frames for doors and windows
- Place the frames as you build the walls
- Build arches over openings using:
- Wooden supports until the arch sets
- Special tapered bags for the arch
- Bags filled with progressively less material toward the center
- Alternatively, use wooden lintels over openings
7. Roof Construction
Several roofing options are compatible with earthbag walls:
- Living Roof: Create a slight dome, cover with waterproof material, add soil and plants
- Wooden Roof: Install wooden beams across the top of walls, add smaller branches, and cover with thatch or clay
- Dome Roof: Continue the earthbag construction in progressively smaller circles
8. Finishing the Structure
- Allow the structure to dry and settle for several days
- Trim any protruding bag material
- Apply a protective coating:
- Clay plaster (clay, sand, and straw mixture)
- Lime plaster (if available)
- Mud mixture with added stabilizers like manure or blood
- Apply the coating in multiple thin layers, allowing each to dry
- Create drainage systems around the building to direct water away from the foundation
Troubleshooting Common Issues
Uneven Walls
Cause: Inconsistent filling or tamping of bags
Solution: Use measuring sticks and guides to maintain consistent height; tamp thoroughly
Wall Bulging
Cause: Excessive weight or pressure, inadequate tamping
Solution: Build walls with a slight inward lean (3-5 degrees); add buttresses for support
Moisture Damage
Cause: Inadequate foundation drainage or roof overhang
Solution: Ensure proper drainage around foundation; extend roof eaves to protect walls
Plaster Cracking
Cause: Too much clay in plaster mix or applying too thickly
Solution: Balance clay with sand; add fiber reinforcement; apply in thin layers