Bow Drill Fire Making
The bow drill is one of the most reliable friction-based fire making methods, combining the principles of the hand drill with mechanical advantage. This technique allows you to create fire with less physical exertion than the hand drill method, making it more accessible and dependable in survival situations.
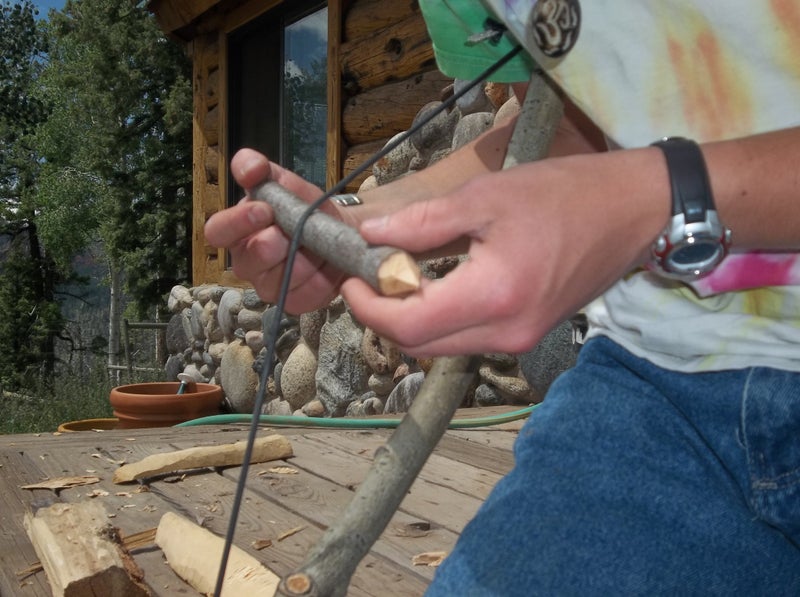
Bow drill fire making technique being demonstrated
Detailed Guide to Bow Drill Fire Making
1. Component Selection and Preparation
The four essential components of a bow drill set: spindle, fireboard, bow, and socket
Spindle Selection
- Ideal characteristics:
- Straight, dry hardwood shaft approximately ¾ inch (18-20mm) in diameter
- About 8-10 inches (20-25cm) long
- Slightly tapered at both ends
- Free of knots or side branches
- Recommended wood species:
- Yucca
- Cedar
- Cottonwood
- Willow
- Aspen
- Poplar
- Preparation:
- Shape one end to a blunt point (for the fireboard)
- Shape the other end to a rounded point (for the socket)
- Ensure the shaft is straight and smooth
Fireboard Selection
- Ideal characteristics:
- Soft, non-resinous wood
- Flat piece approximately 1-2 inches (2.5-5cm) wide
- About 12 inches (30cm) long
- ½ to ¾ inch (12-18mm) thick
- Recommended species:
- Cedar
- Cottonwood
- Basswood/Linden
- Willow
- Aspen
- Poplar
- Preparation:
- Ensure one side is flat and smooth
- Create a small depression near the edge (details below)
- Cut a V-shaped notch from the edge to the center of the depression
Bow Selection
- Ideal characteristics:
- Slightly curved, flexible branch about the thickness of your thumb
- Approximately 24-30 inches (60-75cm) long
- Strong enough to withstand tension but flexible enough to bend slightly
- Recommended materials:
- Green wood branches that have some flexibility
- Naturally curved branches work best
- Cordage options:
- Rawhide or leather strip (doesn't stretch or burn easily)
- Plant fiber cordage (yucca, nettle, dogbane, etc.)
- Sinew
- Strong vines
- Unraveled rope or cloth strips as a last resort
- Preparation:
- Notch both ends of the bow to secure the cordage
- Tie the cordage securely at one end
- Wrap the cordage around the bow
- Tie off at the other end with enough tension to hold the spindle firmly
- The cord should be tight but not so tight that it bends the bow excessively
Socket Selection
- Ideal characteristics:
- Hard material that can withstand friction
- Small enough to hold comfortably in your palm
- Contains a small depression to hold the top of the spindle
- Recommended materials:
- Stone (preferably soapstone or other soft stone)
- Hardwood
- Bone (joint ends work well)
- Antler
- Shell
- Preparation:
- Create a small depression in the center of the material
- The depression should be smooth and slightly deeper than a dimple
- Add a small amount of lubricant (animal fat, oil from skin, or crushed green leaves) to reduce friction
Tinder Preparation
- Ideal characteristics:
- Very fine, dry, and fibrous material
- Catches an ember easily
- Can be formed into a nest or bundle
- Recommended materials:
- Shredded inner bark (cedar, juniper, cottonwood)
- Dried grasses pounded to separate fibers
- Cattail or milkweed fluff
- Dried and shredded fungi
- Bird nests (abandoned ones only)
- Preparation:
- Process material until it's as fine as possible
- Form into a nest shape with a depression in the center
- Keep completely dry until needed
2. Fireboard Preparation
- Creating the socket:
- About ½ inch (12mm) from the edge of the board, make a small depression
- Use a stone tool or knife to create a shallow dimple
- The depression should be just deep enough to keep the spindle from slipping
- Initial charring:
- Place the spindle in the depression
- Rotate it a few times to create a slight char mark
- This helps seat the spindle properly
- Creating the notch:
- After creating an initial depression and slightly charring it
- Cut a V-shaped notch from the edge of the board to the center of the depression
- The notch should extend about 1/8 of the way into the depression
- This notch allows oxygen to reach the ember and provides a place for the ember to form
- Ember catch:
- Place a thin piece of bark or leaf under the notch
- This will catch the ember as it forms and make it easier to transfer to your tinder bundle
3. Bow Drill Technique
Basic Position
- Kneel on one knee with the fireboard on the ground
- Place your foot or knee on the end of the fireboard to stabilize it
- Position the ember catch under the notch
- Loop the bow cord around the spindle once
- Place the spindle in the depression with the bow horizontal
- Hold the socket in your non-dominant hand, placing it on top of the spindle
- Hold the bow in your dominant hand
Drilling Motion
- Starting phase:
- Apply light downward pressure with the socket hand
- Move the bow back and forth in long, smooth strokes
- Use a slow to moderate speed
- Goal: Warm up the wood and create initial friction
- Building phase:
- Gradually increase speed and downward pressure
- Maintain a steady rhythm
- Keep the bow level to prevent the cord from slipping off the spindle
- Goal: Generate significant heat and create wood dust
- Ember phase:
- When you see smoke increasing, maintain or increase speed
- Apply firm downward pressure
- Continue until smoke is pouring from the notch
- Goal: Create a glowing ember in the wood dust
Body Mechanics
- Socket hand position:
- Cup the socket in your palm
- Keep your wrist straight and locked
- Use your arm and shoulder to apply downward pressure, not just your wrist
- Brace your socket arm against your shin or knee for stability
- Bow hand technique:
- Hold the bow firmly but not with a death grip
- Use your whole arm to move the bow, not just your wrist
- Keep movements smooth and consistent
- Maintain the bow in a horizontal position
- Posture:
- Keep your back straight
- Position your body so you can apply downward pressure directly over the spindle
- Brace the fireboard firmly with your foot or knee
4. Ember to Fire Process
- Identifying a successful ember:
- Look for a glowing red spot in the pile of dust
- It should continue to glow and produce smoke after you stop drilling
- The ember will typically be about the size of a pea or small bean
- Transferring the ember:
- Gently tap the fireboard to ensure all the ember falls onto your ember catch
- Carefully remove the fireboard without disturbing the ember
- If needed, use a twig to gently consolidate the ember into a compact mass
- Building the flame:
- Transfer the ember to the depression in your prepared tinder bundle
- Gently fold the tinder around the ember
- Hold the bundle at eye level and blow gently and steadily
- As smoke increases, blow more firmly
- When flames appear, place the bundle in your prepared fire structure
- Add progressively larger kindling as the fire grows
5. Troubleshooting
Common Problems and Solutions
- Cord slipping on spindle:
- Roughen the spindle surface with a stone tool
- Ensure the cord is tight enough
- Keep the bow level during operation
- If the cord is too smooth, try a different material
- Spindle jumping out of the depression:
- Make the depression deeper or wider
- Apply more consistent downward pressure
- Ensure the top of the spindle is properly rounded
- Cord wearing through or breaking:
- Use more durable cordage material
- Ensure the spindle is smooth with no rough spots
- Apply less tension to the cord
- Smoke but no ember:
- Continue drilling longer - sometimes it takes persistence
- Check that your notch extends to the center of the depression
- Ensure your materials are completely dry
- Try a different wood combination
- Socket smoking or burning:
- Add more lubricant to the socket
- Use a harder material for the socket
- Ensure the top of the spindle is properly rounded
- Ember dies quickly:
- Your tinder may be too damp
- The ember may be too small - drill longer next time
- Blow more gently and consistently
- Ensure your tinder is fine enough
Environmental Adaptations
- Humid conditions:
- Store materials inside clothing to dry with body heat
- Look for materials under rock overhangs or inside hollow logs
- Process more tinder than usual as it may take multiple attempts
- Cold weather:
- Warm the fireboard and spindle inside clothing before starting
- Work in a sheltered location
- Have extra tinder prepared and kept warm
- Limited materials:
- Dead standing plants often work better than fallen ones
- In grasslands, look for woody flower stalks from the previous season
- In forests, dead lower branches often remain dry even after rain
6. Practice and Skill Development
The bow drill is easier to master than the hand drill but still requires practice:
- Beginner practice:
- Focus on maintaining a smooth, consistent motion
- Practice keeping the bow level throughout the stroke
- Work on finding the right amount of downward pressure
- Intermediate practice:
- Time how long it takes to create smoke
- Experiment with different wood combinations
- Practice in different weather conditions
- Advanced practice:
- Try to create an ember in under 30 seconds
- Practice with less-than-ideal materials
- Create fire in adverse conditions (light rain, high humidity)
- Make a complete bow drill set using only stone tools