Description
Friction fire methods represent humanity's oldest and most reliable techniques for creating fire without modern tools. These methods work by generating heat through the friction of wood against wood, eventually producing an ember that can be carefully nurtured into flame. While requiring practice and patience, these techniques can be mastered by anyone and rely solely on materials available in nature, making them invaluable survival skills for primitive conditions.
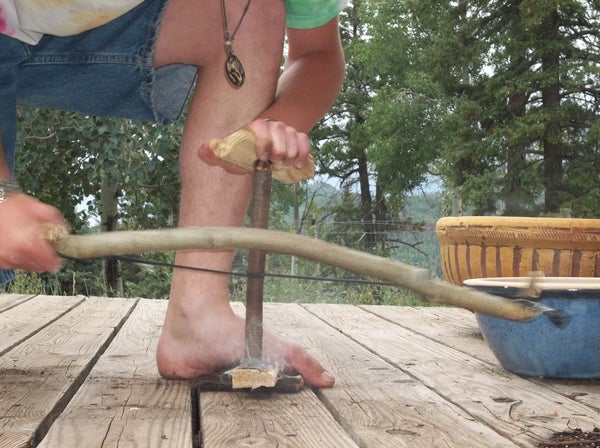
Bow drill fire making technique in action
Practical Guide to Friction Fire Methods
1. Understanding the Principles of Friction Fire
All friction fire methods operate on the same basic principles, though the specific techniques vary:
The Physics of Friction Fire
- Heat generation: Friction between two surfaces converts kinetic energy into heat energy
- Wood dust creation: The friction produces fine wood dust (char) that collects and becomes the ember
- Oxygen management: The ember needs oxygen to grow but not so much that it burns out
- Heat transfer: The ember must be carefully transferred to tinder and nurtured into flame
Critical Components
- Fireboard: The stationary piece of wood that receives friction
- Spindle/Drill: The moving piece that creates friction against the fireboard
- Notch: A V-shaped cut in the fireboard that allows wood dust to collect and oxygen to reach it
- Tinder bundle: Fine, dry material that will catch the ember and burst into flame
Wood Selection
The choice of wood is critical for friction fire success:
- Fireboard woods: Medium-soft, non-resinous woods work best, such as:
- Cottonwood
- Willow
- Aspen
- Cedar
- Basswood
- Poplar
- Spindle woods: Should be the same hardness or slightly harder than the fireboard:
- Yucca
- Mullein
- Cedar
- Willow
- Critical qualities:
- Wood must be completely dry (dead, not green)
- Free of knots or irregularities
- Straight-grained
- Not too dense or too soft
2. Hand Drill Method
The hand drill is the simplest friction fire method, requiring minimal materials but considerable skill and endurance.
Materials Needed
- Fireboard: Flat piece of soft wood, approximately 1-2 cm thick
- Spindle: Straight stick about 30-45 cm long and 1-1.5 cm in diameter
- Tinder bundle: Dry grass, bark fibers, or other fine combustible material
- Ember catch: Small piece of bark or leaf
Preparation Steps
- Prepare the fireboard:
- Cut a small depression near the edge of the fireboard
- Cut a V-shaped notch from the edge to the center of the depression
- Place the ember catch under the notch
- Prepare the spindle:
- Select a straight, dry stick
- Remove any bark or protrusions
- Round both ends slightly
- Prepare your position:
- Kneel with one foot securing the fireboard
- Position the notch away from your body
Execution Technique
- Starting position:
- Place the spindle in the depression
- Hold the spindle upright between your palms
- Apply light downward pressure
- Spinning motion:
- Rub your hands together with the spindle between them
- Move hands downward as you spin
- Return hands to top of spindle without losing contact
- Maintain consistent speed and pressure
- Building heat:
- Start slowly to establish the socket
- Gradually increase speed
- Look for smoke from the depression
- Continue spinning until smoke is steady
- Creating an ember:
- Once smoke is consistent, increase speed and pressure
- Continue until smoke becomes thick
- Carefully remove the spindle while maintaining the ember
- Gently blow on the ember to strengthen it
- Transferring the ember:
- Tap the fireboard to drop the ember onto the catch
- Transfer the ember to your prepared tinder bundle
- Gently blow on the ember while nestled in the tinder
- As the tinder catches, form it into a ball and continue blowing until it flames
Common Challenges and Solutions
- Hand fatigue: Take short breaks; develop calluses through practice
- Spindle jumping out: Start slower; ensure depression is properly formed
- No smoke production: Check wood moisture; increase pressure; try different wood
- Smoke but no ember: Ensure notch is properly cut; increase speed and duration
3. Bow Drill Method
The bow drill is more complex than the hand drill but requires less physical endurance and provides better control, making it the most reliable friction fire method for most people.
Materials Needed
- Fireboard: Flat piece of soft wood, approximately 1-2 cm thick
- Spindle: Straight stick about 15-20 cm long and 1.5-2 cm in diameter
- Bow: Flexible stick about the length of your arm
- Bowstring: Leather thong, plant fiber cordage, or shoelace
- Socket/Handhold: Small piece of hardwood, bone, or stone with a depression
- Tinder bundle: Dry grass, bark fibers, or other fine combustible material
- Ember catch: Small piece of bark or leaf
Preparation Steps
- Prepare the fireboard:
- Create a small depression near the edge
- Cut a V-shaped notch from the edge to the center of the depression
- Place the ember catch under the notch
- Prepare the spindle:
- Shape both ends to be slightly rounded
- The top end should be more pointed than the bottom
- Prepare the bow:
- Select a slightly curved, flexible stick
- Attach the string to both ends, leaving it loose enough to wrap around the spindle once
- The string should not be too tight or too loose
- Prepare the socket:
- Create a small depression in the handhold
- Lubricate the socket with animal fat, oil, or wax if available
Execution Technique
- Setup position:
- Kneel with one knee on the ground
- Place the fireboard under your foot or knee to stabilize it
- Position the notch away from your body
- Assemble the components:
- Wrap the bowstring once around the spindle
- Place the bottom of the spindle in the fireboard depression
- Place the top of the spindle in the socket
- Hold the socket with your non-dominant hand
- Hold the bow with your dominant hand
- Creating friction:
- Apply downward pressure on the socket
- Move the bow back and forth in smooth, even strokes
- Start slowly to establish the socket
- Gradually increase speed while maintaining control
- Building heat:
- Continue the sawing motion at a steady pace
- Look for smoke from the depression
- Maintain consistent pressure and speed
- The wood dust will begin to collect in the notch
- Creating an ember:
- Once smoke is consistent, increase speed slightly
- Continue until smoke becomes thick
- Make a few final, powerful strokes
- Carefully remove the bow and spindle while preserving the ember
- Transferring the ember:
- Tap the fireboard to drop the ember onto the catch
- Transfer the ember to your prepared tinder bundle
- Gently blow on the ember while nestled in the tinder
- As the tinder catches, form it into a ball and continue blowing until it flames
Common Challenges and Solutions
- Bowstring slipping: Adjust tension; create slight notches on spindle ends
- Socket smoking: Add more lubrication; use harder material for socket
- Spindle jumping out: Apply more downward pressure; check bow tension
- No ember forming: Check notch size; ensure wood is dry; increase speed
4. Fire Plow Method
The fire plow is a simpler but more physically demanding method that requires fewer components than the bow drill.
Materials Needed
- Fireboard: Soft wood with a groove cut along its length
- Plow: Hardwood stick with a pointed end
- Tinder bundle: Dry grass, bark fibers, or other fine combustible material
Preparation Steps
- Prepare the fireboard:
- Select a piece of soft wood about 30-40 cm long
- Cut a groove along the length, about 1-2 cm wide and 0.5 cm deep
- The groove should narrow slightly at one end
- Prepare the plow:
- Select a hardwood stick about 30 cm long
- Shape one end to a blunt point
- Position setup:
- Kneel or sit with the fireboard secured between your knees or feet
- Place tinder at the end of the groove
Execution Technique
- Starting the plow:
- Place the pointed end of the plow stick at the far end of the groove
- Hold the plow at a 45° angle
- Apply firm downward pressure
- Creating friction:
- Push the plow forward along the groove with firm pressure
- Return to the starting position
- Repeat the forward stroke with consistent pressure
- Building heat:
- Increase speed gradually
- Wood dust will begin to collect at the end of the groove
- Continue until smoke appears
- Creating an ember:
- Once smoke appears, increase speed
- The dust pile will begin to glow
- Continue until a definite ember forms
- Transferring the ember:
- Carefully add the ember to your tinder bundle
- Gently blow on the ember to ignite the tinder
- Form the tinder into a ball as it catches
Common Challenges and Solutions
- Groove becoming too deep: Create a new groove parallel to the first
- Dust dispersing: Create a small collection area at the end of the groove
- Excessive fatigue: Use shorter strokes; take brief rests
- No ember forming: Increase pressure; check wood dryness; try different wood
5. Tinder Preparation and Ember Nurturing
Proper tinder preparation is as important as the friction technique itself. Even the best ember will fail without properly prepared tinder.
Ideal Tinder Materials
- Plant fibers:
- Cattail or milkweed fluff
- Cedar bark shredded to fine fibers
- Inner bark of dead trees (not green)
- Dry grass pounded and separated into fine fibers
- Fungus:
- Amadou (horse hoof fungus)
- Chaga fungus
- Dried shelf fungi
- Animal materials:
- Bird down or nest material
- Fine animal hair
- Dried mouse or squirrel nests
Tinder Bundle Construction
- Prepare the core:
- Create a small nest of the finest, most combustible material
- This will directly receive the ember
- Material should be bone dry and fluffy
- Build the bundle:
- Surround the core with progressively coarser material
- Shape into a bird's nest about the size of your two cupped hands
- The bundle should be dense enough to hold together but loose enough for airflow
- Create an air channel:
- Form a small depression in the center for the ember
- Ensure there's a channel for air to reach the ember when blowing
Ember to Flame Technique
- Transfer the ember:
- Carefully place the ember in the center depression of your tinder bundle
- Gently fold the tinder around the ember
- Oxygen control:
- Begin with very gentle blowing
- Aim for the ember, not the surrounding tinder
- Gradually increase breath as the ember grows
- Bundle manipulation:
- Slowly raise the bundle as smoke increases
- Continue gentle blowing
- When flames appear, carefully transfer to your prepared kindling structure
Troubleshooting Common Issues
No Smoke Production
Cause: Insufficient friction; damp materials; improper technique
Solution: Increase pressure and speed; ensure materials are completely dry; check that wood combination is appropriate
Smoke But No Ember
Cause: Insufficient heat buildup; poor notch design; ember dispersing
Solution: Maintain friction longer; ensure notch allows dust to collect; check that dust is accumulating properly
Ember Dies Quickly
Cause: Insufficient oxygen; damp tinder; ember too small
Solution: Ensure proper airflow; use bone-dry tinder; continue friction technique longer to build larger ember
Tinder Smokes But Won't Flame
Cause: Tinder too dense or damp; insufficient oxygen; blowing too hard
Solution: Use drier, fluffier tinder; ensure proper air channel; blow steadily and gradually increase force
Physical Fatigue Before Success
Cause: Inefficient technique; poor materials; lack of conditioning
Solution: Use bow drill instead of hand drill; improve material selection; practice regularly to build specific muscles