Description
Stone cutting tools represent humanity's first technological advancement and remain essential for survival in primitive conditions. This guide provides detailed instructions for selecting appropriate stone materials, mastering knapping techniques, creating effective cutting edges, and maintaining stone tools for long-term use. These fundamental skills form the foundation of all subsequent technological development.
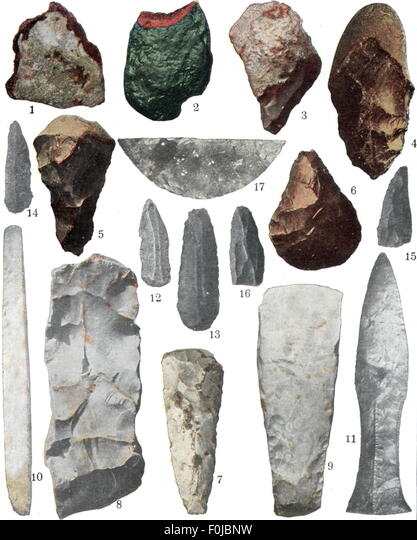
Various stone tools including blades, scrapers, and points
Practical Guide to Stone Cutting Tools
1. Material Selection
The quality of your stone tools depends primarily on selecting appropriate raw materials. Not all stones are suitable for knapping (the process of shaping stone through controlled fracturing).
Optimal Stone Types
- Flint: The gold standard for stone tools. Look for nodules in chalk deposits, limestone outcrops, or river gravels. High-quality flint has a smooth, waxy texture and produces a distinctive ringing sound when struck against another hard object.
- Chert: Similar to flint but often more varied in color and quality. Found in limestone formations and stream beds. Good chert has a fine-grained, homogeneous structure without visible inclusions.
- Obsidian: Volcanic glass that produces the sharpest edges known (sharper than modern surgical steel). Found near volcanic regions. Obsidian is typically black or dark green and has a glassy appearance with conchoidal (shell-like) fracture patterns.
- Quartzite: A metamorphic rock that can be knapped if fine-grained enough. More difficult to work than flint or obsidian but often more readily available. Look for varieties that appear homogeneous without visible crystal structures.
- Jasper and Agate: Cryptocrystalline varieties of quartz that can produce excellent tools. Often found in areas with volcanic activity or as river cobbles.
Field Testing Stone Quality
- Sound Test: Strike two pieces of the stone together lightly. Good knapping material produces a clear, ringing sound rather than a dull thud.
- Fracture Test: Strike off a small flake from the edge of the stone. Quality material will produce a predictable conchoidal fracture with sharp edges.
- Light Test: Hold thin edges up to light. Good knapping stone should be somewhat translucent at the thinnest edges.
- Texture Assessment: Quality knapping stone feels smooth and homogeneous, without graininess or visible crystals.
- Water Test: Place a drop of water on the stone. On good knapping material, the water should bead up rather than immediately soaking in.
2. Basic Knapping Techniques
Stone knapping is the controlled breaking of stone to produce tools with sharp edges. There are two primary techniques: percussion flaking and pressure flaking.
Percussion Flaking
- Prepare your workspace:
- Find a comfortable seated position
- Place a leather pad on your thigh to protect from sharp flakes
- Wear eye protection if available (or work with face turned slightly away)
- Have a container ready to catch useful flakes
- Hard-hammer percussion:
- Select a hammerstone (rounded, dense stone that fits comfortably in your hand)
- Hold the core stone in your non-dominant hand, supporting it on your thigh
- Strike the edge of the core at a 45-60° angle with a quick, controlled blow
- Aim to remove large flakes that can be further worked into tools
- Rotate the core as you work to maintain a workable edge angle
- Soft-hammer percussion:
- Use an antler, dense bone, or hardwood billet instead of stone
- Hold the core as with hard-hammer technique
- Strike with a more glancing blow, "pushing" rather than "hitting"
- This technique produces thinner, more controlled flakes
- Particularly useful for thinning and shaping tools after initial hard-hammer work
- Bipolar technique:
- Place the core stone on a flat anvil stone
- Strike the top of the core directly with a hammerstone
- The force travels through the core and rebounds from the anvil
- This technique is useful for splitting small nodules or working with difficult materials
Pressure Flaking
- Prepare your tools:
- Create a pressure flaker from antler tine, bone splinter, or hardwood
- Shape one end to a blunt point
- Prepare a palm pad from folded leather or thick hide
- Basic pressure flaking technique:
- Hold the stone securely against the leather pad in your palm
- Position the tip of the pressure flaker against the edge at a 45° angle
- Apply steady, increasing pressure until a flake detaches
- Work systematically along the edge, removing small flakes
- This technique allows for precise control and fine detail work
- Creating serrated edges:
- Use the tip of the pressure flaker to remove alternating flakes from opposite sides of the edge
- Work in a regular pattern to create uniform serrations
- Serrated edges are excellent for cutting fibrous materials
- Notching technique:
- Use the pressure flaker to create indentations for hafting tools to handles
- Support the stone firmly and work with very controlled pressure
- Create notches by removing a series of small flakes from the same spot
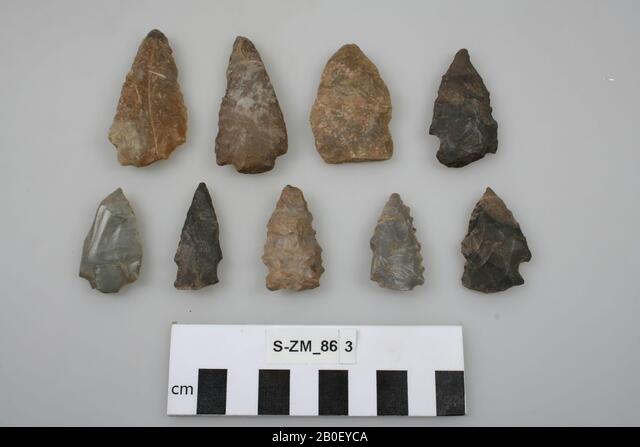
Stone arrowheads demonstrating various shapes and notching techniques
3. Creating Specific Tool Types
Different tasks require specialized tool forms. Here are instructions for creating the most essential stone tool types:
Cutting Flakes
- Expedient cutting flakes:
- Strike a core stone to produce flakes with naturally sharp edges
- Select flakes with long, straight edges
- Use immediately without further modification
- These are the quickest tools to produce and can be extremely sharp
- Improved cutting flakes:
- Select a promising flake with a comfortable holding area
- Use pressure flaking to refine the cutting edge
- Create a slight convex curve for optimal cutting performance
- Dull any sharp areas that would cut your hand during use
Scrapers
- End scrapers:
- Select a thick flake with one narrow end
- Use pressure flaking to create a steep (60-80°) edge on the narrow end
- The steep edge prevents the tool from digging too deeply
- Ideal for scraping hides, wood, and bone
- Side scrapers:
- Choose a flake with one long, straight edge
- Create a steep edge along the long side using pressure flaking
- Ensure the opposite edge is comfortable to hold or dull it for safety
- Useful for long, straight scraping motions
Points and Piercing Tools
- Basic awl:
- Select a thick, triangular flake
- Use pressure flaking to refine the point
- Create a robust point that won't break easily
- Useful for punching holes in leather, bark, or other materials
- Fine needle/drill:
- Start with a long, narrow flake
- Use careful pressure flaking to create a thin, cylindrical point
- Work around the entire circumference to create a round cross-section
- Ideal for precision work and drilling small holes
- Projectile points:
- Begin with a large, thin flake
- Use soft-hammer percussion to thin and shape the overall form
- Switch to pressure flaking for edge refinement and notching
- Create a symmetrical form with a sharp tip and balanced weight
- Add notches or stems for hafting to a shaft
Chopping Tools
- Hand axe:
- Select a large, thick core or cobble
- Use hard-hammer percussion to create a pointed or rounded working end
- Shape the opposite end to fit comfortably in the hand
- Create a sinuous edge that combines strength with cutting ability
- Useful for heavy cutting, chopping, and digging
- Cleaver:
- Start with a large, flat flake
- Create a straight, sharp edge on one end using hard-hammer percussion
- Leave the opposite end thick for gripping
- Ideal for cutting through joints when butchering
4. Tool Maintenance and Resharpening
Stone tools dull with use but can be maintained and resharpened to extend their useful life.
Edge Maintenance
- Regular inspection:
- Examine edges after use for signs of dulling or damage
- Look for small chips, rounded edges, or polish
- Address damage early before it requires major reshaping
- Light resharpening:
- Use pressure flaking to remove small flakes along the dulled edge
- Work at a shallow angle to maintain the original edge geometry
- Remove only enough material to restore sharpness
- Major resharpening:
- For heavily damaged tools, use soft-hammer percussion to remove larger flakes
- Reshape the edge to a new profile if necessary
- Follow with pressure flaking to refine the new edge
Tool Transformation
- Repurposing:
- Convert broken tools into new, smaller tools
- Transform a broken projectile point into a drill or scraper
- Use fragments from larger tools as expedient cutting flakes
- Material conservation:
- In areas where knapping stone is scarce, develop a system for tool recycling
- Collect all usable flakes and fragments during knapping
- Store in categories based on potential uses
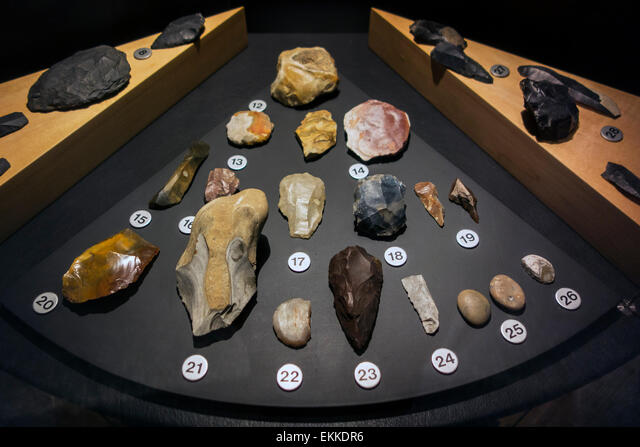
Various stone tools showing different stages of use and resharpening
5. Safety Considerations
Stone knapping produces extremely sharp flakes and tools that can cause serious injuries if proper precautions aren't taken.
Personal Protection
- Eye protection:
- Always protect your eyes from flying flakes
- Use goggles if available
- If no eye protection is available, position yourself so flakes fly away from your face
- Hand protection:
- Use leather pads or thick hide to protect your palm when pressure flaking
- Be aware of where your fingers are at all times
- Never apply force toward any part of your body
- Leg protection:
- Always use a leather pad on your thigh when knapping
- Position the pad to catch falling flakes
- Wear thick pants if available
Workspace Management
- Designated knapping area:
- Establish a specific area for knapping away from high-traffic zones
- Keep the area clear of unnecessary items
- Position yourself so flakes fall in a predictable direction
- Flake management:
- Use a catch basin or tarp to collect flakes
- Regularly clean up sharp debris
- Dispose of waste flakes in a designated area away from barefoot traffic
- Tool storage:
- Store finished tools in protective wrappings
- Keep sharp edges covered when not in use
- Organize tools to prevent accidental cuts when reaching for them
Troubleshooting Common Issues
Unpredictable Fractures
Cause: Internal flaws in the stone, incorrect striking angle, or too much force
Solution: Test stone quality before extensive work; maintain consistent 45-60° striking angle; use controlled, precise force rather than excessive power
Step Fractures
Cause: Force terminating before traveling through the stone, often due to thinning attempts
Solution: Adjust platform angle; strike closer to the edge; use soft-hammer technique for thinning
Hinge Fractures
Cause: Force curving upward before completing the flake
Solution: Strike from a different direction; remove hinges by coming in from the side; use thinner platforms for better force transmission
Edge Collapse
Cause: Platform too thin or weak for the applied force
Solution: Strengthen platforms by grinding slightly; reduce force; change angle of pressure
Excessive Tool Breakage
Cause: Tools too thin for intended use or improper technique
Solution: Match tool thickness to intended function; create specialized tools for heavy work; improve technique to reduce lateral stress on tools