Detailed Guide to Essential Stone Age Tools
The foundation of human technological development begins with mastering a core set of stone tools. This guide provides detailed, practical instructions for creating and using the essential tools that form the basis of Stone Age survival and advancement. With these fundamental implements, you can perform the critical tasks needed for shelter construction, food acquisition and processing, and the creation of more advanced tools.
1. Choppers and Hand Axes
Basic Chopper

Description: A chopper is one of the most primitive and versatile stone tools, consisting of a cobble with one end flaked to create a sharp, jagged edge while leaving the opposite end unmodified as a gripping surface.
Materials needed:
- Rounded cobble approximately 10-15 cm in diameter
- Hammerstone for flaking
Detailed creation process:
- Select a rounded cobble that fits comfortably in your hand
- Identify which end will become the cutting edge (typically the narrower end)
- Hold the cobble firmly with the intended cutting edge facing up
- Strike downward at approximately a 45° angle to remove flakes from one side
- Turn the cobble over and remove flakes from the opposite side to create a zigzag edge
- Continue removing flakes until you have a sharp, jagged edge spanning about 1/3 of the cobble's circumference
- Leave the opposite end completely unmodified for gripping
- Test the edge by attempting to cut into soft wood
Primary uses:
- Chopping small branches and woody plants
- Breaking animal bones to access marrow
- Digging in soft soil
- Crushing nuts and seeds
- Rough butchering of game
Maintenance:
- When edge becomes dull, rejuvenate by removing additional flakes
- If edge becomes severely damaged, repurpose the tool for pounding or crushing
Bifacial Hand Axe
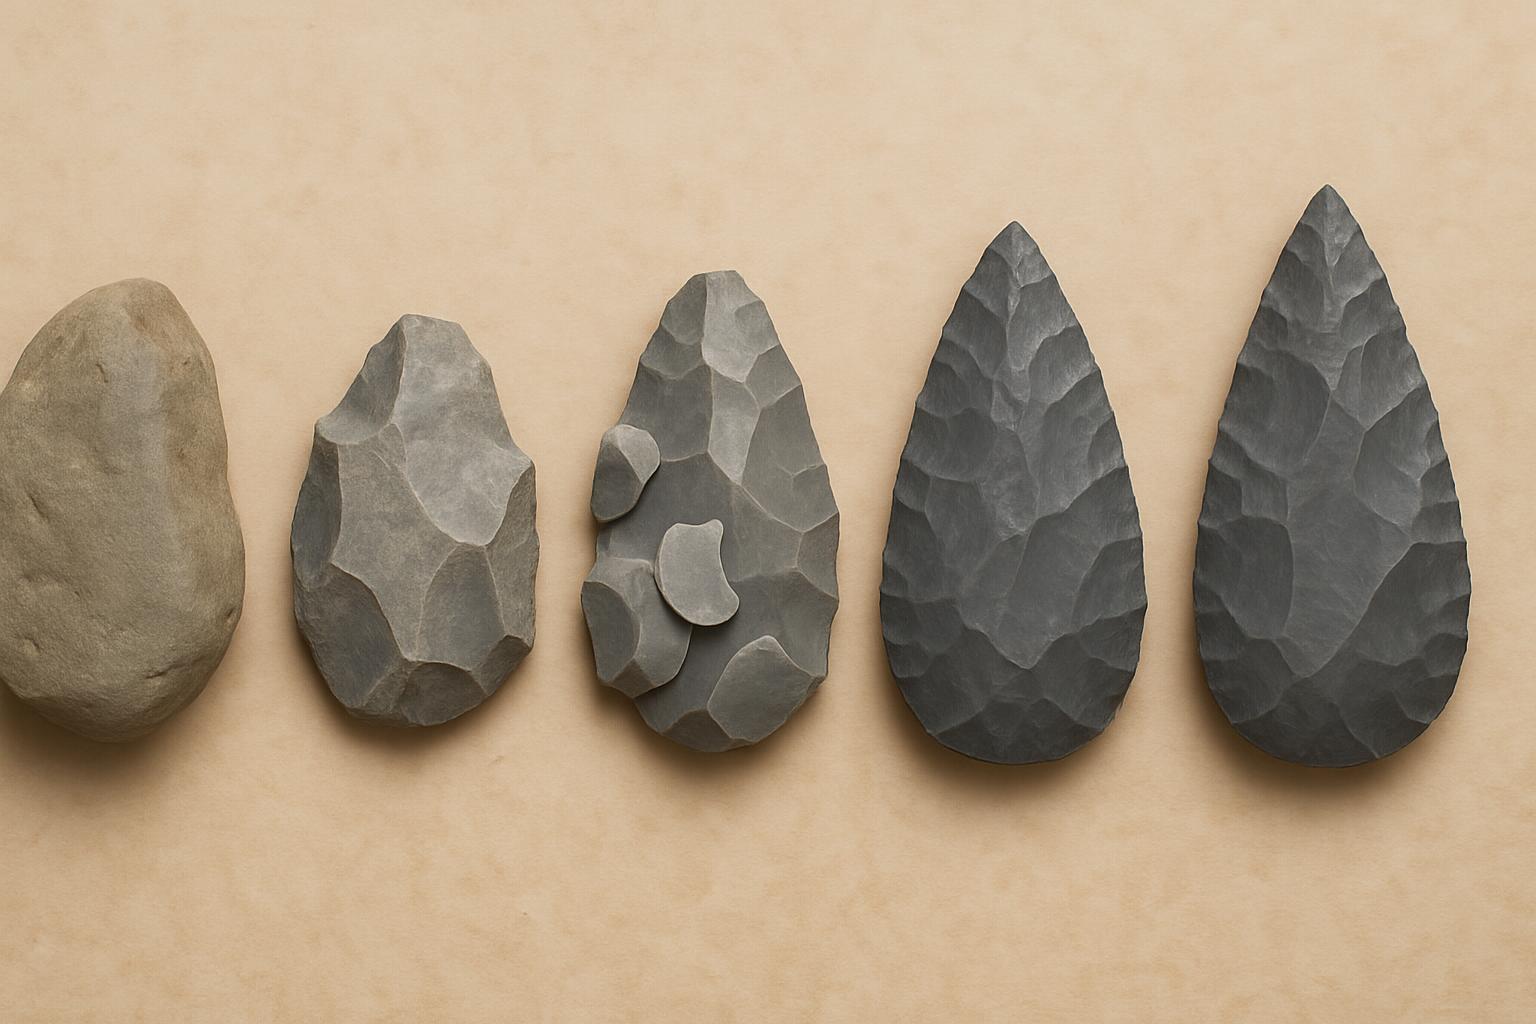
Description: A hand axe is a more sophisticated tool than the chopper, featuring a teardrop or ovate shape with sharp edges all around and a pointed tip. It is worked on both faces (bifacial) to create a symmetrical, versatile implement.
Materials needed:
- Fist-sized stone of good flaking quality (flint, chert, obsidian, or fine-grained quartzite)
- Hammerstone for rough shaping
- Smaller hammerstone or antler billet for refinement
- Pressure flaker (antler tine or similar) for edge work
Detailed creation process:
- Initial shaping:
- Select a stone with at least one flat surface to serve as a striking platform
- Hold the stone with the platform facing up
- Strike the edge of the platform to remove large flakes around the perimeter
- Turn the stone over and repeat the process
- Continue alternating sides until a rough teardrop shape emerges
- Thinning:
- Use a smaller hammerstone or antler billet for more controlled flaking
- Remove flakes from both faces, working from the edges toward the center
- Focus on reducing the thickness while maintaining the teardrop shape
- Alternate between faces to maintain symmetry
- Edge refinement:
- Use pressure flaking to create a finer, straighter edge
- Work systematically around the entire perimeter
- Pay special attention to creating a sharp, strong point
- Ensure the base is rounded and comfortable to hold
- Final shaping:
- Remove any remaining high spots or irregularities
- Check for symmetry from all angles
- Test the edge and point for sharpness
- Make final adjustments as needed
Primary uses:
- Cutting meat, hide, and plant materials
- Chopping small trees and branches
- Scraping hides when using the side edge
- Digging in harder soils
- Piercing and cutting with the pointed end
- Butchering game
Advanced techniques:
- Hafting: The hand axe can be attached to a wooden handle using sinew, plant fiber, or tree resin to create a more powerful cutting tool
- Specialized forms: The basic hand axe shape can be modified for specific tasks by changing the proportions or edge angles
2. Scrapers
Side Scraper

Description: A side scraper is a flake tool with one or more edges modified to create a steep, strong edge ideal for scraping materials like animal hides, wood, or bone.
Materials needed:
- Large flake with at least one straight edge
- Hammerstone for initial shaping
- Pressure flaker for edge refinement
Detailed creation process:
- Select a large, relatively flat flake with at least one straight edge
- Hold the flake with the flat (ventral) side facing up
- Using a hammerstone, carefully remove small flakes along the intended scraping edge
- Work from the dorsal (outer) side toward the ventral side
- Create a steep edge angle between 45-80° (steeper than a cutting edge)
- Use pressure flaking to refine the edge, removing any weak points
- Continue until you have a strong, uniform scraping edge
- Optionally shape the opposite end for comfortable gripping
Primary uses:
- Scraping animal hides to remove fat and tissue
- Smoothing wooden shafts for tools
- Preparing plant fibers for cordage
- Removing bark from branches
- Shaping bone and antler tools
Technique for use:
- Hold the scraper with a firm grip, scraping edge facing away from you
- Pull or push the tool across the material being worked
- For hide preparation, stretch the hide on a frame or log before scraping
- Use short, controlled strokes for precision work
- Adjust the angle of the tool to control the depth of scraping
End Scraper

Description: An end scraper is a specialized tool with a rounded, steep working edge at one end of a flake or blade, leaving the opposite end unmodified for gripping.
Materials needed:
- Long flake or blade
- Hammerstone for initial shaping
- Pressure flaker for edge refinement
Detailed creation process:
- Select a long flake or blade with a suitable thickness at one end
- Hold the flake with the flat (ventral) side facing up
- Using a hammerstone, remove small flakes from the end to create a rounded edge
- Work from the dorsal side toward the ventral side
- Create a steep edge angle (approximately 60-80°)
- Use pressure flaking to refine the edge into a smooth, convex shape
- Leave the opposite end unmodified for gripping
- Optionally remove sharp edges along the sides for comfortable handling
Primary uses:
- Fine hide preparation and thinning
- Detailed woodworking
- Creating grooves in bone or antler
- Preparing plant materials
Technique for use:
- Hold the tool with the scraping edge facing away from you
- Push the tool away from your body in controlled strokes
- For hide work, use a thumb grip on top for better pressure control
- The rounded edge allows for smooth, continuous scraping motions
- Can be used one-handed or with both hands for more pressure
Hafting options:
- End scrapers can be hafted to a handle for improved leverage and control
- Attach to a short wooden or bone handle using sinew and adhesive
- The handle should be perpendicular to the scraping edge, like a modern cabinet scraper
3. Blades and Points
Stone Blades

Description: Stone blades are long, parallel-sided flakes with sharp cutting edges, typically at least twice as long as they are wide. They represent a more advanced flaking technology that produces efficient cutting tools with minimal waste.
Materials needed:
- High-quality core stone (flint, obsidian, or fine-grained chert)
- Hammerstone for platform preparation
- Soft hammer (antler, bone, or hardwood) for blade removal
Detailed creation process:
- Core preparation:
- Select a stone with fine-grained, homogeneous structure
- Create a flat striking platform at one end
- Shape the core to create a slight convex face for blade removal
- Remove any irregularities that might interfere with blade detachment
- Blade removal:
- Hold the core firmly with the platform facing up
- Position the soft hammer near the edge of the platform
- Strike with a controlled, glancing blow
- The force should travel through the core, detaching a long, parallel-sided blade
- Continue removing blades around the perimeter of the core
- Blade selection:
- Choose blades with straight, sharp edges
- Look for blades with minimal curvature
- Select appropriate sizes for different tasks
- Optional edge refinement:
- Use pressure flaking to refine edges if needed
- Create serrations for specific cutting tasks
- Dull portions of the edge that will be handled
Primary uses:
- Precision cutting of meat, hide, and plant materials
- Carving wood, bone, and antler
- Harvesting plant materials
- Serving as blanks for creating other specialized tools
Handling techniques:
- Use bare blades by wrapping one end with hide or plant material
- Insert into wooden or bone handles using slots and adhesive
- Arrange multiple blades in sequence to create longer cutting edges
- For delicate work, use smaller blades with precise finger control
Spear Points
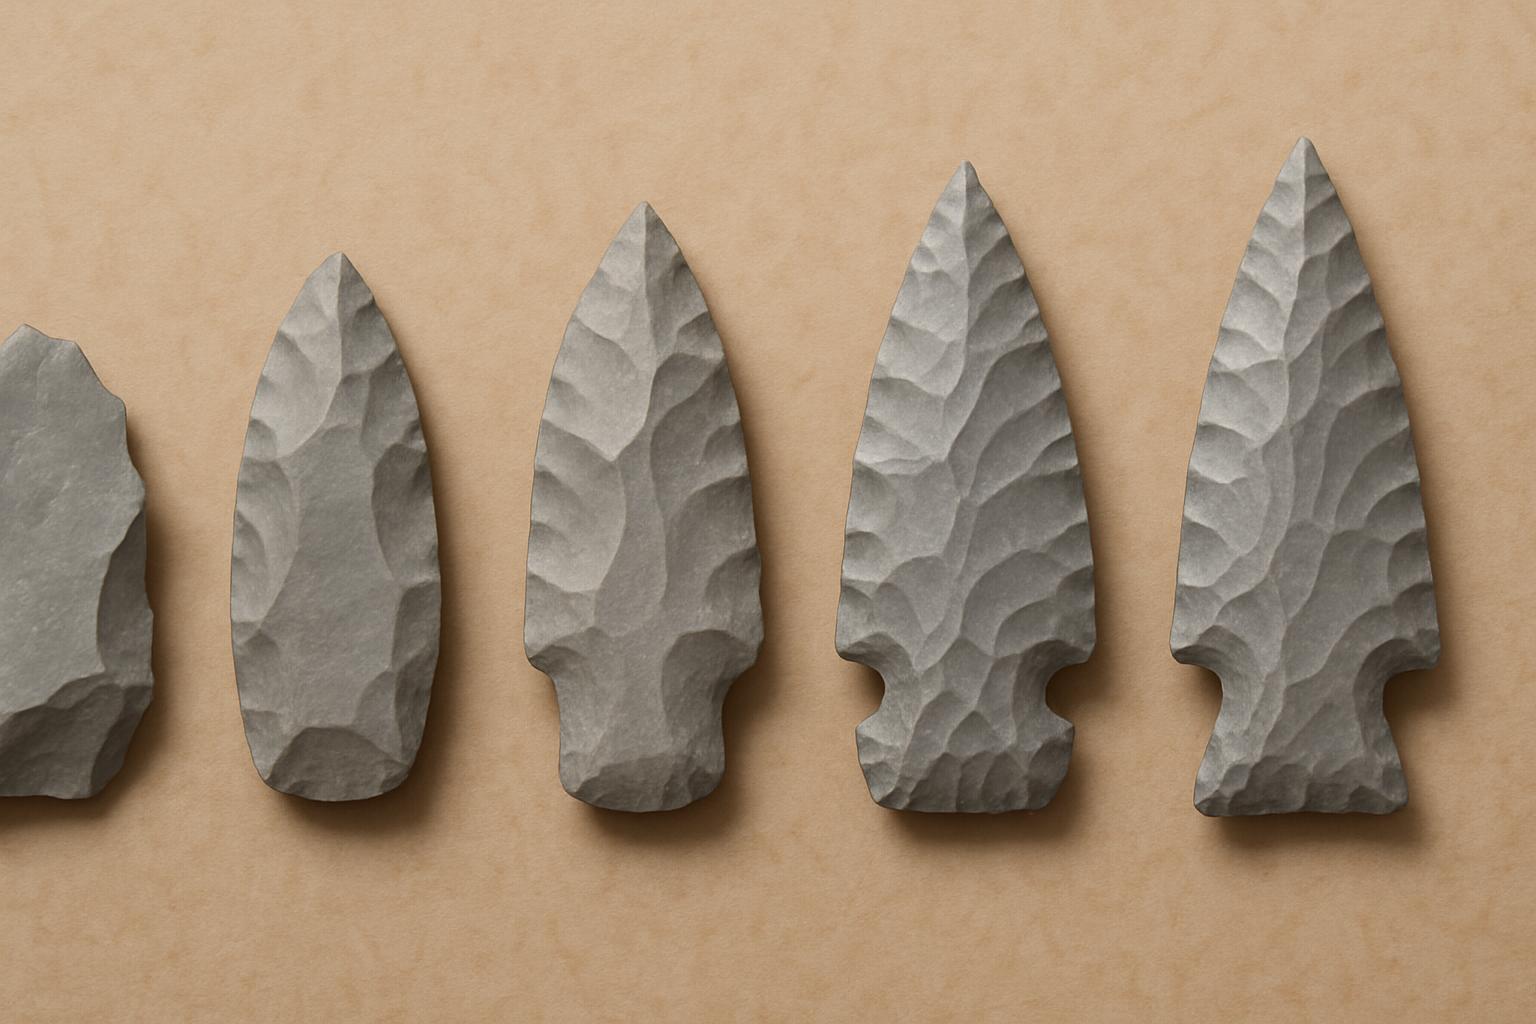
Description: Spear points are carefully shaped stone tools designed to be attached to wooden shafts for hunting and defense. They feature a sharp, symmetrical point and a base shaped for secure attachment.
Materials needed:
- Large flake or thin stone of appropriate size
- Hammerstone for initial shaping
- Pressure flaker (antler tine or similar) for refinement
- Abrading stone for platform preparation
Detailed creation process:
- Blank selection:
- Choose a flake that is already roughly the shape of the intended point
- The flake should be relatively thin with no major flaws
- Ideal thickness is 5-10mm depending on intended use
- Initial shaping:
- Use percussion flaking to establish the basic outline
- Work from both faces to maintain symmetry
- Create a rough leaf or triangular shape
- Establish the basic form of the base (straight, concave, or stemmed)
- Edge and point refinement:
- Switch to pressure flaking for precise control
- Prepare platforms by grinding the edge slightly
- Remove small flakes systematically around the perimeter
- Work from both faces, alternating sides to maintain symmetry
- Pay special attention to creating a sharp, durable point
- Base preparation:
- Shape the base according to the intended hafting method
- For notched points, use a specialized pressure flaker
- For stemmed points, narrow the base with careful pressure flaking
- Ensure the base is symmetrical and properly proportioned
- Final thinning and straightening:
- Remove any remaining thick areas
- Ensure the point is straight when viewed from all angles
- Make final adjustments to edges and symmetry
- Test the point for sharpness and strength
Hafting techniques:
- Split shaft method:
- Split one end of a wooden shaft
- Insert the base of the point into the split
- Secure with sinew, plant fiber, or hide binding
- Apply adhesive (pine resin, birch tar) if available
- Notched shaft method:
- Create a notch in the end of the shaft
- Shape the base of the point to fit the notch
- Secure with binding and adhesive
- Socket method:
- Create a socket in the shaft end
- Shape the base of the point to fit into the socket
- Secure with binding around the shaft
- Hunting medium to large game
- Fishing for larger species
- Defense against predators or hostile groups
- Cutting tool when unhafted
Primary uses:
4. Specialized Tools
Awls and Perforators

Description: Awls and perforators are pointed stone tools designed for puncturing and creating holes in materials like hide, wood, and bark. They feature a sharp, durable point and a comfortable gripping area.
Materials needed:
- Small flake or blade with potential for a pointed projection
- Pressure flaker for shaping
Detailed creation process:
- Select a flake with a natural projection or corner
- Use pressure flaking to shape and refine the projection into a point
- Remove material from both sides to create a symmetrical, tapered point
- Ensure the point is strong enough for the intended use
- Shape the base for comfortable handling or hafting
- Test the point for sharpness and strength
Primary uses:
- Puncturing holes in animal hides for lacing
- Creating holes in wood or bark for lashing
- Engraving designs in soft materials
- Extracting small food items (like shellfish)
Technique for use:
- Hold the tool firmly between thumb and forefinger
- Apply steady pressure while twisting slightly
- For thicker materials, use a rotating motion to enlarge holes
- Can be hafted to a handle for better leverage
Burins

Description: Burins are specialized tools with a sharp, chisel-like edge created by removing a flake at a right angle to the edge of a blade or flake. They are designed for carving grooves and working hard materials like bone, antler, and ivory.
Materials needed:
- Blade or thick flake
- Hammerstone or pressure flaker
Detailed creation process:
- Select a blade or thick flake with a suitable edge
- Create a small striking platform at the edge
- Strike the platform at a right angle to the edge
- This removes a special "burin spall" flake, creating a sharp, right-angled edge
- The intersection of the break and the flat surface forms the burin edge
- Optionally remove additional burin spalls to refine the edge
- Shape the opposite end for comfortable handling
Primary uses:
- Carving grooves in bone, antler, and ivory
- Creating slots in wooden handles for inserting stone blades
- Engraving decorative designs
- Splitting bone and antler
Technique for use:
- Hold the burin with the working edge perpendicular to the material
- Push or pull to create a groove or channel
- For deeper grooves, make multiple passes
- Can be used with a hammerstone for more force when needed
Variations:
- Single-facet burin: Created by removing one burin spall
- Dihedral burin: Created by removing two burin spalls that meet at a point
- Multiple-facet burin: Created by removing several burin spalls for a wider working edge
5. Grinding and Pounding Tools
Grinding Stones

Description: Grinding stones consist of a large, flat base stone (metate) and a smaller hand stone (mano) used together to grind and process plant foods, pigments, and other materials.
Materials needed:
- Large, flat stone for the base (ideally sandstone, granite, or basalt)
- Smaller, hand-sized stone for grinding
Detailed creation process:
- Base stone (metate) selection:
- Find a large, flat stone approximately 30-50 cm in length
- Look for a slightly concave natural surface or one that can be shaped
- The stone should be stable when placed on the ground
- Ideal materials are sandstone, granite, or basalt
- Base stone preparation:
- If needed, shape the surface by pecking with a hammerstone
- Create a shallow depression in the center
- Smooth any sharp edges for safety
- Hand stone (mano) selection:
- Find a smooth, comfortable stone that fits in one or both hands
- Ideal shape is oval or rectangular with rounded edges
- Should be heavy enough to apply good pressure but not too heavy for extended use
- Hand stone preparation:
- Shape if necessary by pecking or grinding against another stone
- Smooth any sharp edges
- Test for comfortable grip and effective grinding action
Primary uses:
- Grinding seeds, nuts, and grains into flour
- Processing plant materials for medicine
- Crushing minerals for pigments
- Preparing plant fibers
- Grinding dried meat into pemmican
Technique for use:
- Place the base stone on a stable surface, slightly tilted toward the user
- Put the material to be ground in the center depression
- Hold the hand stone with one or both hands
- Use a back-and-forth or circular motion to grind the material
- Periodically gather material back to the center
- Continue until desired consistency is achieved
Maintenance:
- Periodically "resharpen" the grinding surface by pecking to roughen it
- Clean thoroughly between processing different materials
- Store in a dry location to prevent cracking
Hammerstones and Pestles

Description: Hammerstones are rounded stones used for striking and pounding, while pestles are elongated stones used with a mortar (bowl-shaped stone) for crushing and grinding materials.
Materials needed:
- Dense, hard stones (quartzite, granite, or dense basalt)
- For pestles: elongated stones of appropriate size
- For mortars: stones with natural or created depressions
Detailed creation process:
- Hammerstone selection:
- Find rounded stones that fit comfortably in the hand
- Select different sizes for different tasks
- Look for naturally rounded river cobbles
- Ensure the stone is dense and without cracks
- Pestle creation:
- Find an elongated stone with one rounded end
- Shape if necessary by pecking with another stone
- Create a rounded working end and a comfortable gripping area
- Smooth any sharp edges
- Mortar creation:
- Find a stone with a natural depression or one that can be shaped
- Deepen the depression by pecking with a hammerstone
- Smooth the interior by grinding with another stone and sand
- Ensure the base is stable
Primary uses:
- Hammerstones:
- Stone tool making (percussion flaking)
- Crushing nuts and hard seeds
- Breaking bones for marrow extraction
- Shaping other stone tools
- Pestles and mortars:
- Grinding seeds, nuts, and berries
- Crushing herbs for medicine
- Preparing pigments from minerals
- Processing fibrous plants
Technique for use:
- Hammerstone:
- Hold firmly in the hand
- Use controlled strikes for precision work
- Use heavier blows for crushing and breaking
- Pestle and mortar:
- Place material in the mortar
- Hold the pestle vertically
- Use up and down pounding motion for initial breaking
- Use grinding circular motion for final processing
6. Tool Maintenance and Storage
Tool Maintenance

Regular maintenance:
- Inspect tools regularly for damage or dulling
- Resharpen cutting edges as soon as they begin to dull
- For cutting tools, use pressure flaking to remove small flakes along the edge
- For scrapers, rejuvenate the edge by removing flakes from the working face
- Clean tools after use, especially those used with organic materials
Repair techniques:
- Broken points: Reshape into smaller points or different tools
- Damaged edges: Rework by removing the damaged section
- Cracked tools: Evaluate for potential recycling into smaller tools
- Worn grinding stones: Rejuvenate by pecking the surface to roughen it
Tool recycling:
- Broken tools should be evaluated for potential new uses
- Large broken pieces can be reworked into smaller tools
- Exhausted cores can be used as hammerstones
- Flake waste should be saved for potential use as expedient tools
Tool Storage and Transport

Storage considerations:
- Store tools in dry locations to prevent moisture damage
- Keep cutting tools separate to prevent edge damage
- Wrap delicate tools in hide, bark, or plant material for protection
- Organize tools by type and function for easy access
- Store grinding stones face-down to protect the working surface
Transport methods:
- Create hide pouches with separate compartments for different tools
- Use bark containers lined with moss or grass for delicate tools
- Wrap cutting tools in protective material to prevent injury and damage
- For long journeys, carry only essential tools and raw materials
Tool kits:
- Organize tools into functional kits for specific activities:
- Hunting kit: points, knife blades, scraper for field dressing
- Hide working kit: various scrapers, awls, burnishing stones
- Woodworking kit: choppers, burins, abrading stones
- Tool making kit: hammerstones, pressure flakers, raw material
- Each kit should be stored and transported as a unit
Conclusion
Mastering the creation and use of these essential Stone Age tools provides the foundation for all survival activities and technological advancement. Each tool represents a solution to a specific challenge, and together they form a comprehensive toolkit that enables humans to thrive in diverse environments.
The skills developed in creating these basic tools—understanding material properties, applying appropriate techniques, and adapting designs to specific needs—form the basis for all future technological innovation. As you become proficient with these fundamental implements, you'll develop the knowledge and abilities needed to create increasingly sophisticated tools and eventually advance to working with new materials like metals.
Remember that tool creation is an iterative process. Each tool you make will be better than the last as you refine your techniques and develop a deeper understanding of the materials. Practice, observation, and adaptation are the keys to mastering Stone Age technology and laying the groundwork for rebuilding civilization.